Brewing Description -- Extract with
Partial Grain
This web page provides a quick overview of the process I use to brew
beer. I do a
full boil (meaning I start by boiling the full 5 gallons of water for
my batch). I
add some grain during the heating of the water but I brew using malt
extract rather than
using a "full grain" process. I think my beer turns out
great. The
first batch I tried did not make use of a starter or wort chiller and I
don't think the
process was nearly as easy nor did the beer turn out as good.
 Making a starter is
important. When you pitch a starter you have a lot of
yeast that quickly goes to work. This makes fermentation start
very quickly and the "good yeast" that you are pitching wins the war to
begin fermenting your wort minimizing the chance that any "bad yeast"
or other organisms floating around the air will have a chance to start
growing in your beer. Making a starter is
important. When you pitch a starter you have a lot of
yeast that quickly goes to work. This makes fermentation start
very quickly and the "good yeast" that you are pitching wins the war to
begin fermenting your wort minimizing the chance that any "bad yeast"
or other organisms floating around the air will have a chance to start
growing in your beer.
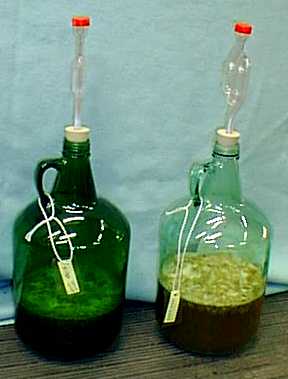
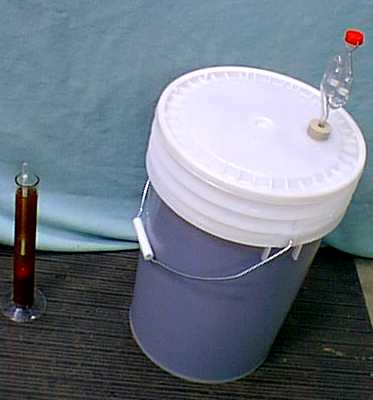
Here is how to make the starter: Boil
two quarts of water and add 1/2 pound of Dried Malt Extract
(DME). Stir this as you add the extract and keep stirring until
you feel confident that this will not boil over. If you leave
uncovered the chances of boil over are much less. A boil over
will make a mess! Add a few hops flowers. A rounded
teaspoon of hops is enough. The hops help to prevent an infection
and also make this small batch of wort have the same characteristics as
the large batch you will brew in a few days. Let this boil for
ten minutes. The last couple minutes of the boil I turn the heat down
and cover -- checking frequently to make sure this doesn't boil
over. That helps to sterilize the lid of the pot. Then I
remove from heat and sit in a sink of cold water. You need
to let the wort cool to about 70 degrees. Putting the pot in some
cold water will speed this up. Once cool put the wort in a dark 1
gallon container, such as the wine bottle pictured here. Pitch
the yeast (I like Wyeast liquid yeast) at a temperature of around 70
degrees. Too hot will kill the yeast so be careful!
Install an air lock and let the yeast grow for a couple of days.
In the photo I have made two batches of starter for two
different beers. Each starter uses a different yeast so I have
labels on the bottles.
|
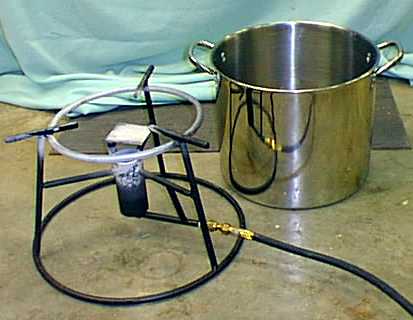 A large pot and big burner are
important. You want to boil the full 5 gallons of water
in your batch. The pot needs to be large enough that the batch
doesn't boil over. A large pot and big burner are
important. You want to boil the full 5 gallons of water
in your batch. The pot needs to be large enough that the batch
doesn't boil over.
Caution: Don't
even consider using a propane burner like this in your house!
You will spill a little bit of beer in the process and that would make
a mess. A boil over is a possibility if you aren't careful and
that would make a big mess in your house. The type of burner
shown lets some small carbon flakes float away and you really don't
want those in your house. (I've heard that some types of burners
aren't quite as prone to this.) And most important -- the propane
burner consumes oxygen. I brew in my garage with the door
slightly open. Don't use this burner in an enclosed space.
It will be running for a couple hours and it absolutely must have a
good source of oxygen -- and so must you.
|
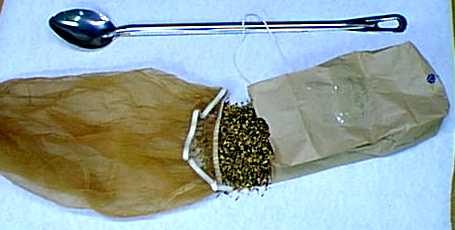 Put your grain in a mesh bag and tie the bag
closed. Use a somewhat thick cotton string to make it easy to cut
the string and re-use the bag. I actually dump the grain in the
mesh bag with the bag held over the kettle of water. Anything
smaller than the mesh size on the bag I allow to fall into the
kettle. Put the mesh bag full of grain in the kettle when the
water is cool, before you begin to heat the water. Stir
occasionally. Put your grain in a mesh bag and tie the bag
closed. Use a somewhat thick cotton string to make it easy to cut
the string and re-use the bag. I actually dump the grain in the
mesh bag with the bag held over the kettle of water. Anything
smaller than the mesh size on the bag I allow to fall into the
kettle. Put the mesh bag full of grain in the kettle when the
water is cool, before you begin to heat the water. Stir
occasionally. |
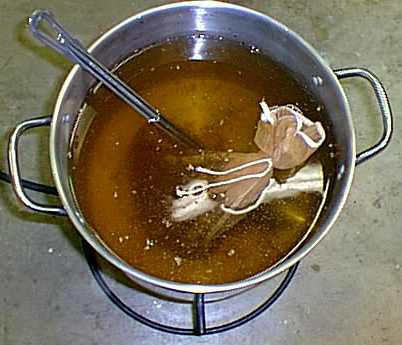 The water will take on some color due to the
grain. Begin heating the water. I typically allow about 45
minutes for the water to reach 180 degrees at which time I will remove
the grain. Tip: Don't leave the spoon in the water as it
heats. It will get hot! Stir now and then as the water
heats. The water will take on some color due to the
grain. Begin heating the water. I typically allow about 45
minutes for the water to reach 180 degrees at which time I will remove
the grain. Tip: Don't leave the spoon in the water as it
heats. It will get hot! Stir now and then as the water
heats. |
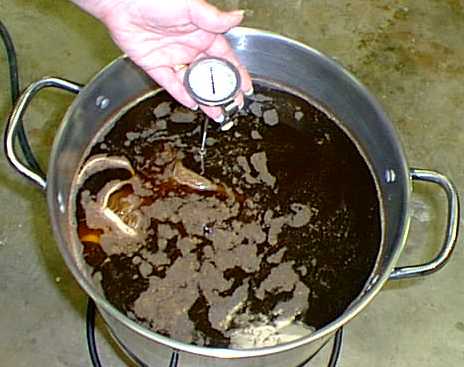 I log times and temperatures on a piece of
paper as the water heats, recording the temperature about every 10
minutes. This gives me a good idea of when the water will reach
the desired temperature for grain removal. I log times and temperatures on a piece of
paper as the water heats, recording the temperature about every 10
minutes. This gives me a good idea of when the water will reach
the desired temperature for grain removal. |
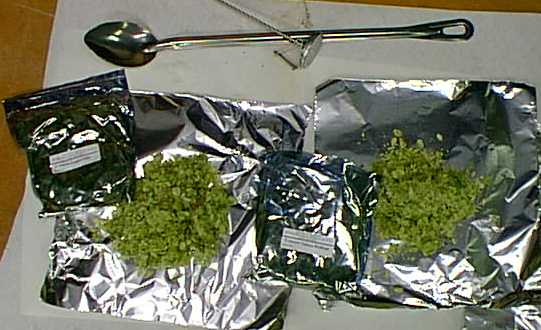 While the wort heats use the time to measure
out your hops. The recipe I am making here requires 4 ounces of
hops total. Each bag shown in the photo holds 2 ounces. One
bag is added at the beginning of the boil The other bag of hops
is added during the boil, in 1/2 ounce increments. The bag at the left
is still full. The center bag has been divided into two
approximately equal sized piles. I will divide each pile again,
ending up with 4 aluminum foil pouches each with 1/2 ounce of
hops. This makes it easy to add at the appropriate time during
the boil. While the wort heats use the time to measure
out your hops. The recipe I am making here requires 4 ounces of
hops total. Each bag shown in the photo holds 2 ounces. One
bag is added at the beginning of the boil The other bag of hops
is added during the boil, in 1/2 ounce increments. The bag at the left
is still full. The center bag has been divided into two
approximately equal sized piles. I will divide each pile again,
ending up with 4 aluminum foil pouches each with 1/2 ounce of
hops. This makes it easy to add at the appropriate time during
the boil. |
 At 180 degrees the grain comes out. I let it
drain, and then place the bag in a plastic bucket or bowl to
cool. The mesh bag shown can be re-used a number of times.
Just dump the cool grain out and rinse the bag. At 180 degrees the grain comes out. I let it
drain, and then place the bag in a plastic bucket or bowl to
cool. The mesh bag shown can be re-used a number of times.
Just dump the cool grain out and rinse the bag. |
 Continue heating until the wort comes to a
boil. Once I remove the grain I typically turn up the heat some
to speed the process. Continue heating until the wort comes to a
boil. Once I remove the grain I typically turn up the heat some
to speed the process. |
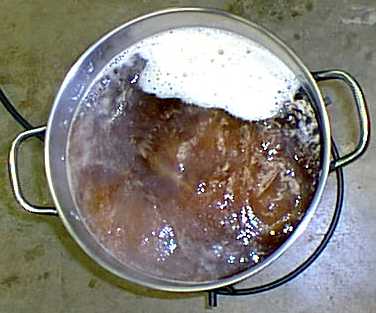
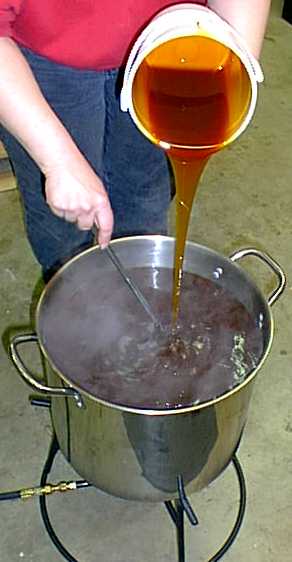 Now add the extract. You really need a
helper here. Have one person stir with a long spoon while the
other person slowly adds the extract. You must avoid scorching
the extract on the bottom of the pot -- if you don't stir continuously
or if you pour too quickly you will burn some of the malt
extract. I get my malt extract in bulk in the plastic bucket seen
in this photo. Caution: These
buckets have plastic handles which can be removed by pulling straight
down on the handle. When the bucket is tipped upside down the
handle can come out. Be very careful to hold the bucket with both
hands. If you simply hold by the handle and tip the
bottom up the handle could come off causing the bucket to fall into the
near boiling liquid. This has not happed to me due to
caution. Don't let it happen to you! Once the malt extract
is added the wort will stop boiling. Stir frequently and let it
return to a boil. Once it returns to a boil you need to keep stirring
for a while to prevent a boil over. You may wish to turn the heat
down a bit. Don't cover or it will surely boil over! After
a few minutes of boiling while you stir it should be safe to sit back
and watch it boil for 5 minutes to make sure this is not going to boil
over. Now add the extract. You really need a
helper here. Have one person stir with a long spoon while the
other person slowly adds the extract. You must avoid scorching
the extract on the bottom of the pot -- if you don't stir continuously
or if you pour too quickly you will burn some of the malt
extract. I get my malt extract in bulk in the plastic bucket seen
in this photo. Caution: These
buckets have plastic handles which can be removed by pulling straight
down on the handle. When the bucket is tipped upside down the
handle can come out. Be very careful to hold the bucket with both
hands. If you simply hold by the handle and tip the
bottom up the handle could come off causing the bucket to fall into the
near boiling liquid. This has not happed to me due to
caution. Don't let it happen to you! Once the malt extract
is added the wort will stop boiling. Stir frequently and let it
return to a boil. Once it returns to a boil you need to keep stirring
for a while to prevent a boil over. You may wish to turn the heat
down a bit. Don't cover or it will surely boil over! After
a few minutes of boiling while you stir it should be safe to sit back
and watch it boil for 5 minutes to make sure this is not going to boil
over. |
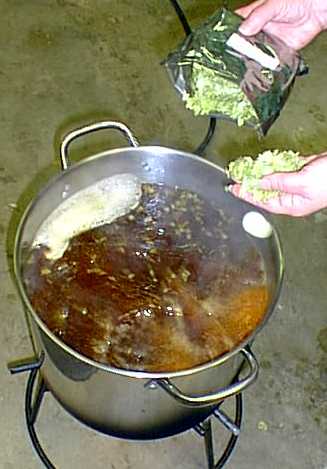 Now add the first of your hops. This marks
the start of your "boil time". Most of my recipes use a 60
minute boil meaning that once I add the first of the hops I boil for an
additional 60 minutes. During this boil I will add the remaining
hops. The hops that are added near the beginning of the boil will
have the maximum acid and bitterness extracted from them. The
hops added near the end of the boil will give more aroma and less
bitterness. Now add the first of your hops. This marks
the start of your "boil time". Most of my recipes use a 60
minute boil meaning that once I add the first of the hops I boil for an
additional 60 minutes. During this boil I will add the remaining
hops. The hops that are added near the beginning of the boil will
have the maximum acid and bitterness extracted from them. The
hops added near the end of the boil will give more aroma and less
bitterness. |
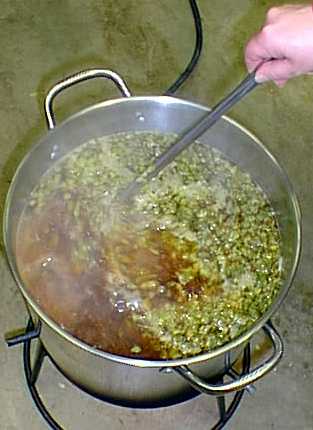 Stir the hops in and enjoy the aroma! I
use a small digital timer to time the intervals between each hops
addition. Before I start brewing I write down a list of the times
that I need to boil between each addition of hops. As I add the
hops I set the timer to the time remaining before the next addition of
hops and I cross out the time just consumed. This gives me one
less thing to calculate in the middle of my brewing and less chance for
a mistake. Stir the hops in and enjoy the aroma! I
use a small digital timer to time the intervals between each hops
addition. Before I start brewing I write down a list of the times
that I need to boil between each addition of hops. As I add the
hops I set the timer to the time remaining before the next addition of
hops and I cross out the time just consumed. This gives me one
less thing to calculate in the middle of my brewing and less chance for
a mistake. |
 Let the wort boil gently for the time called
for by the recipe (typically 60 minutes for my brewing). Add hops
at the correct times. You can cover partly if
you turn down the heat but don't cover completely or the mix is likely
to boil over. Let the wort boil gently for the time called
for by the recipe (typically 60 minutes for my brewing). Add hops
at the correct times. You can cover partly if
you turn down the heat but don't cover completely or the mix is likely
to boil over. |
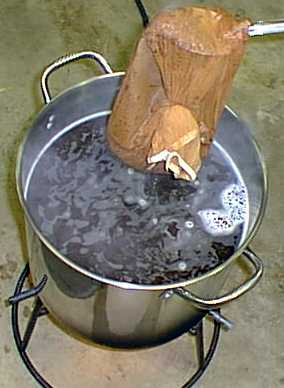
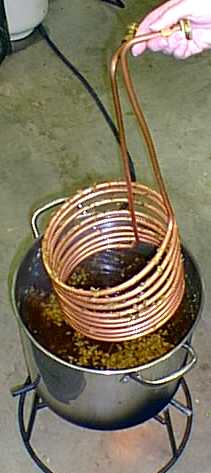 With 10 to 15 minutes of boil time left
place the wort chiller in the wort. This will momentarily stop
the boil but it will start again. Empty out what water you can,
but be aware that there will still be some water left in the wort
chiller. Make sure that the two ends of the chiller extend over
the edge of the pot as some of the water in the chiller is going to
boil and will come out of the ends. With 10 to 15 minutes of boil time left
place the wort chiller in the wort. This will momentarily stop
the boil but it will start again. Empty out what water you can,
but be aware that there will still be some water left in the wort
chiller. Make sure that the two ends of the chiller extend over
the edge of the pot as some of the water in the chiller is going to
boil and will come out of the ends. |
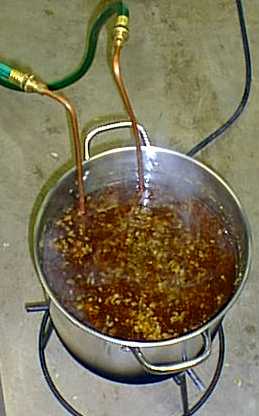 With
about 1 minute of boil time left connect the a hose to each end of the
wort chiller. Caution: The
wort chiller will now be very hot! You will need pot
holders to connect the hose. Don't connect the hose at the start
as I suspect that the heat might melt the hose connection. When
the end of the boil time arrives simply turn off the heat and turn on
the water. I have two hoses that are used for nothing but brewing
which keeps them clean and prevents getting too much dirt around my
brewing area. With
about 1 minute of boil time left connect the a hose to each end of the
wort chiller. Caution: The
wort chiller will now be very hot! You will need pot
holders to connect the hose. Don't connect the hose at the start
as I suspect that the heat might melt the hose connection. When
the end of the boil time arrives simply turn off the heat and turn on
the water. I have two hoses that are used for nothing but brewing
which keeps them clean and prevents getting too much dirt around my
brewing area. |
 Now pour the wort into the fermenting bucket
straining the hops as you do this. The fermenting bucket should
have been sanitized prior to this. Now pour the wort into the fermenting bucket
straining the hops as you do this. The fermenting bucket should
have been sanitized prior to this. |
 Top off the fermenting bucket, but remember
you will be adding another 1/2 gallon when you pitch the yeast
starter. Check the temperature and once down to about 70 degrees
pitch the yeast starter. Swish the starter to pick up all the
yeast sediment. I check the gravity and record the starting
gravity. Top off the fermenting bucket, but remember
you will be adding another 1/2 gallon when you pitch the yeast
starter. Check the temperature and once down to about 70 degrees
pitch the yeast starter. Swish the starter to pick up all the
yeast sediment. I check the gravity and record the starting
gravity. |
 If the receipt is for a beer
with a high starting specific gravity, such as a porter, I suggest
starting the fermentation with a "blow off" tube rather than a standard
air lock. This will allow a vigorous fermentation to take
place without popping the lid off the bucket. Allow to ferment in
a place with even temperatures around 70 degrees. (Cooler for a
lager as called for in your recipe). If the receipt is for a beer
with a high starting specific gravity, such as a porter, I suggest
starting the fermentation with a "blow off" tube rather than a standard
air lock. This will allow a vigorous fermentation to take
place without popping the lid off the bucket. Allow to ferment in
a place with even temperatures around 70 degrees. (Cooler for a
lager as called for in your recipe). |
 If you started with a blow off
tube you can switch to a standard air lock after a few days once the
fermentation has slowed. Wait until the bubbles through the air
lock have stopped before you rack the mixture to a carboy. This
will take a week or two. If you wait too long the spent yeast
will impart flavors to the beer that you don't want. If you started with a blow off
tube you can switch to a standard air lock after a few days once the
fermentation has slowed. Wait until the bubbles through the air
lock have stopped before you rack the mixture to a carboy. This
will take a week or two. If you wait too long the spent yeast
will impart flavors to the beer that you don't want. |
 Temperature changes in the room may cause a
bubble every now and then but a rate of 1 bubble per minute means the
fermentation is still underway. Temperature changes in the room may cause a
bubble every now and then but a rate of 1 bubble per minute means the
fermentation is still underway. |
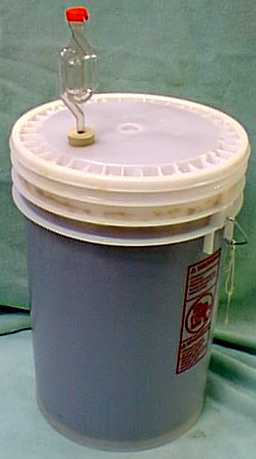
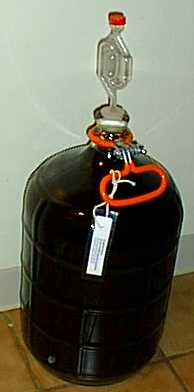 When fermentation has completed or at least
slowed to no more than one bubble every two minutes rack the beer to a
glass carboy. Sanitize the carboy and siphon tube. Note
the label on the carboy handle. The label helps you remember what
you have brewed, and the carboy handle helps prevent dropping a
carboy. Both are a good idea! Important:
Protect the carboy from light. You want to keep the beer
around room temperature for a couple weeks, perhaps a bit longer for a
heavy stout or porter. During this time protect it from light as
the light can "skunk" the beer, giving it an unpleasant taste. When fermentation has completed or at least
slowed to no more than one bubble every two minutes rack the beer to a
glass carboy. Sanitize the carboy and siphon tube. Note
the label on the carboy handle. The label helps you remember what
you have brewed, and the carboy handle helps prevent dropping a
carboy. Both are a good idea! Important:
Protect the carboy from light. You want to keep the beer
around room temperature for a couple weeks, perhaps a bit longer for a
heavy stout or porter. During this time protect it from light as
the light can "skunk" the beer, giving it an unpleasant taste. |
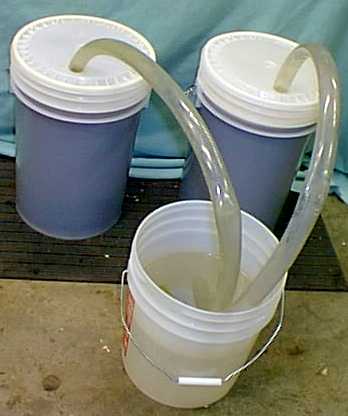
I keg my beer, meaning that I transfer from the carboy to a 5 gallon
"soda"
keg and carbonate with a CO2 tank. If I want to bottle I use a
counterpressure
bottler so I don't ferment in the bottles. This means less yeast
in the bottle and a
nicer beer I think. To bottle you would rack to a bucket, add the
necessary sugar, and the
bottle. When you "rack" the beer from one container to another
siphon
carefully using sanitized equipment and don't introduce any more air
than necessary.